






Frequently Asked Questions for Employers

Introduction to Health Connector for Business

How do I know if my business is eligible for Health Connector for Business?

How do I calculate my full-time equivalent (FTE) employees?

The number of full-time eligible employees is the sum of:

  • All full-time employees, defined as an employee who works on average at least 30 hours per week in any month

    AND

  • The total number of hours worked by part-time employees in a month divided by 120.

When counting your full-time equivalent employees, do not include the following:

  • owners of the business,
  • spouses of owners,
  • tax-dependents of owners,
  • seasonal workers working 120 days or less in a year,
  • independent contractors (Form 1099 workers),
  • COBRA enrollees, and
  • retired enrollees.

While some employee types should not be included in the full-time equivalent employee count, they may still qualify to enroll with the group.

Not sure how to count your full-time equivalent employees? Click here to learn more.

What documents do I need to submit proof of eligibility?

View a list of documents to prove eligibility.

When do I need to apply to get coverage for my employees?

Review this list to see application deadlines and coverage dates.

Can I get a quick quote for my employees?

Watch the video below for steps to create a quick quote for a company.

Video: Getting a Quick Quote

This video walks brokers through how to get a quick health or dental quote for your employees using the Health Connector’s employer quoting tool. This step-by-step guide shows you how to build a quote in minutes.

Video Title: HCB Employers: Getting a Quick Quote
Publisher: Health Connector
Video Duration: 1:36

Transcript

[0:00]
Narrator: Here is how to get a quick health or dental quote for your employees on the Health Connector website. Choose Getting Started.
[Visual: The screen displays the Health Connector homepage. The cursor navigates to and clicks the “Getting Started” option.]

[0:07]
Narrator: Select the Start Here button under Employers, choose Get a quote.
[Visual: The screen shows the Getting Started page. The cursor clicks the “Start Here” button under the “Employers” section, then selects “Get a quote.”]

[0:13]
Narrator: Start by entering the effective date.
[Visual: A quote form appears. The cursor clicks into the effective date field and enters a date.]

[0:16]
Narrator: Choose the SIC code for the industry of your business.
[Visual: The cursor selects the SIC code that matches the business industry from a drop-down menu.]

[0:21]
Narrator: Enter the business zip code. The county will fill in automatically.
[Visual: The cursor enters the business zip code. The county field populates automatically on screen.]

[0:26]
Narrator: To upload a list of employees, start by downloading the Employee Roster template.
[Visual: The cursor clicks the link to download the Employee Roster template.]

[0:32]
Narrator: In the template, you only need to enter employee or dependent’s name, date of birth, and relationship status.
[Visual: The Employee Roster template opens, displaying columns for name, date of birth, and relationship status. Sample entries are shown.]

[0:38]
Narrator: For relationship status, choose from the drop-down menu, save the file, choose Select File to Upload, and find the saved file on your computer.
[Visual: The cursor selects a relationship status from a drop-down menu, saves the file, clicks “Select File to Upload,” and locates the saved file on the computer.]

[0:52]
Narrator: Then choose Upload the Employee Roster.
[Visual: The cursor clicks the “Upload the Employee Roster” button.]

[0:56]
Narrator: For each employee, choose the coverage type: health, dental, or both.
[Visual: The screen displays the uploaded employee list. The cursor selects a coverage type—health, dental, or both—for each employee.]

[1:01]
Narrator: When you’ve completed uploading the roster, select View Plans.
[Visual: The cursor clicks the “View Plans” button after coverage selections are complete.]

[1:06]
Narrator: Select a Benefit Model to view available plans.
[Visual: The screen displays Benefit Model options. The cursor selects a model to reveal the available plans.]

[1:11]
Narrator: You can see the plan options, benefits, and your costs.
[Visual: The screen displays a list of plans, showing benefits and associated costs for each option.]

[1:17]
Narrator: Click on the Filter button to refine your options.
[Visual: The cursor clicks the “Filter” button, opening options to narrow the plan results.]

[1:22]
Narrator: Click Save PDF to download the plan comparison list.
[Visual: The cursor clicks the “Save PDF” button, downloading the plan comparison list.]

[1:28]
Narrator: Click Select Dental to see the dental plan options for your employees.
[Visual: The cursor clicks the “Select Dental” button, displaying available dental plan options.]

[1:33]
Narrator: Dental quotes can also be filtered.
[Visual: The screen shows dental plan results with filter options available to refine the list.]

How much do I need to contribute to my employees’ insurance?

At a minimum, employers are required to contribute 50 percent toward the cost of the premium for an individual employee, and 33 percent toward the cost of the premium for any covered spouse, domestic partner, or child. However, for coverage starting January 1, each year, there is no contribution requirement.

How do I create an account and apply for insurance for my employees?

Watch the video below for instructions on creating an employer account.

Video: Creating an Employer Account

Learn how to complete the eligibility screening tool and set up your employer account step by step. This video walks you through answering the key eligibility questions and entering your business details.

Video Title: HCB Employers: Creating an Account
Publisher: Health Connector
Video Duration: 2:27

Transcript

[0:00]
Narrator: Here’s how to create an account for your business.
[Visual: The Health Connector website homepage is displayed on screen.]

[0:04]
Narrator: On the Health Connector website, choose “Create Account,” then choose “Employers.”
[Visual: The cursor navigates to and clicks the “Create Account” button, then selects the “Employers” option.]

[0:10]
Narrator: Complete the eligibility screening tool before you can create an account. Click the “Next” button to begin.
[Visual: The eligibility screening tool page appears. The cursor clicks the “Next” button to start the process.]

[0:17]
Narrator: Does your business currently have 1 to 50 full-time equivalent employees?
[Visual: The first eligibility question appears on screen with “Yes” and “No” answer options.]

[0:23]
Narrator: If you’re not sure, choose “How do I calculate my FTEs.”
[Visual: The cursor clicks the “How do I calculate my FTEs” link, expanding additional guidance on screen.]

[0:28]
Narrator: The number of full-time eligible employees is the sum of all full-time employees, defined as an employee who works on average at least 30 hours per week in any month, and the total number of hours worked by part-time employees in a month divided by 120.
[Visual: The FTE calculation guidance is displayed on screen, showing the formula for calculating full-time equivalents.]

[0:47]
Narrator: If the answer is no, choose “No” and click “Next.” If the answer is yes, choose “Yes” and then click “Next.”
[Visual: The cursor selects either “Yes” or “No” and clicks the “Next” button to proceed.]

[0:56]
Narrator: Does this business have at least one non-owner employee who will enroll in coverage?
[Visual: The second eligibility question appears on screen with “Yes” and “No” answer options.]

[1:02]
Narrator: If so, choose “Yes,” then click “Next.” If the answer is no, choose “No,” then click “Next.”
[Visual: The cursor selects the appropriate answer and clicks the “Next” button to continue.]

[1:11]
Narrator: Does the business have its principal business address in Massachusetts, or have a worksite in Massachusetts and plan to offer coverage to each eligible employee serving that employee’s primary worksite? If so, select “Yes,” then click “Next” to continue.
[Visual: The third eligibility question appears on screen. The cursor selects “Yes” and clicks “Next.”]

[1:29]
Narrator: If not, choose “No,” then click “Next” to continue.
[Visual: The cursor selects “No” and clicks the “Next” button to proceed.]

[1:34]
Narrator: Will the business be offering coverage to at minimum all full-time W-2 eligible employees?
[Visual: The fourth eligibility question appears on screen with “Yes” and “No” answer options.]

[1:41]
Narrator: If so, choose “Yes,” then click the “Next” button. If not, choose “No” and click the “Next” button.
[Visual: The cursor selects the appropriate answer and clicks the “Next” button.]

[1:50]
Narrator: If you answered “No” to any question, you may not be eligible to shop for coverage. However, if you wish to continue, choose “Creating an Employer Account.”
[Visual: A results screen appears indicating the business may not be eligible. The “Creating an Employer Account” option is displayed and the cursor clicks it.]

[2:00]
Narrator: You may be eligible for coverage for your business. To determine next steps, choose “Create an Account.”
[Visual: An eligibility confirmation screen appears. The cursor clicks the “Create an Account” button.]

[2:07]
Narrator: On the “Create Account” page, enter a username such as your email address, a password, and confirm your password. Then click the “Create Account” button.
[Visual: The Create Account form appears on screen. The cursor enters a username, password, and confirmed password, then clicks the “Create Account” button.]

[2:17]
Narrator: Next, provide some basic information about you and your business. As the point of contact for the small business, provide your name and date of birth.
[Visual: A profile information form appears. The cursor enters the contact’s name and date of birth into the appropriate fields.]

[2:24]
Narrator: Now provide information about the small business, including company legal name, federal employer identification number, industry code, and primary office location. Then click the “Confirm” button.
[Visual: The business information section of the form is displayed. The cursor fills in the company legal name, FEIN, industry code, and office location, then clicks the “Confirm” button.]

What do my employees need to do to enroll or waive coverage?

Your employees will need to create accounts and enroll or waive coverage. Instructions are available here. Alternatively, employees can call our customer service team to complete their enrollment/waiver over the phone (1-888-813-9220).

At least 75% of your employees must enroll or waive coverage.

Should I add all my employees?

Yes, you should add all of your employees to the roster even if some do not need insurance. Adding all eligible employees to the roster demonstrates an official offer of coverage by the employer to the employee.  When an employee participates by submitting a waiver, they’ll be able to enroll with the group if their other coverage is terminated in the future.

Watch the video below to learn how to add employees.

Video: Adding Employees

Learn how to build your employee roster by uploading a completed template or adding employees one by one. You’ll also learn which fields are required and how to add dependents, such as family members.

Video Title: HCB Employers: Adding an Employee
Publisher: Health Connector
Video Duration: 01:24

Transcript

[0:00]
Narrator: Add eligible employees to your employee roster.
[Visual: The screen displays the employer dashboard on the Health Connector website.]

[0:03]
Narrator: Select the Employees tab on the left side of your screen.
[Visual: The cursor clicks the “Employees” tab in the left navigation menu.]

[0:07]
Narrator: You can add employees individually by selecting the Add Employee button. You can upload a list of employees by selecting Upload Employee Roster.
[Visual: The screen shows the Employees page. The cursor points to the “Add Employee” button, then to the “Upload Employee Roster” button.]

[0:16]
Narrator: Click the Download Employee Roster to download the template. This is how the spreadsheet will appear.
[Visual: The cursor clicks “Download Employee Roster.” A spreadsheet template opens on screen.]

[0:23]
Narrator: You must include relationship, last name, first name, email address, social security number, date of birth, gender, date of hire, and is business owner.
[Visual: The spreadsheet displays column headers for relationship, last name, first name, email address, social security number, date of birth, gender, date of hire, and business owner status.]

[0:37]
Narrator: Then, save the file to your desktop.
[Visual: The cursor saves the completed spreadsheet file to the desktop.]

[0:40]
Narrator: Choose Select the File to Upload.
[Visual: The cursor clicks the “Select the File to Upload” button.]

[0:43]
Narrator: Choose the file.
[Visual: A file selection window opens. The cursor selects the saved roster file.]

[0:46]
Narrator: To add employees individually, click Add Employee.
[Visual: The cursor clicks the “Add Employee” button on the Employees page.]

[0:50]
Narrator: Add the employee’s first name, last name, date of birth, social security number, gender, date of hire, address, kind, and email address.
[Visual: An employee entry form appears. The cursor fills in fields for first name, last name, date of birth, social security number, gender, date of hire, address, kind, and email address.]

[1:04]
Narrator: Then, click Create Employee.
[Visual: The cursor clicks the “Create Employee” button.]

[1:08]
Narrator: Click Add Dependents to add family members.
[Visual: The cursor clicks the “Add Dependents” button.]

[1:12]
Narrator: Mandatory fields for dependents are first name, last name, social security number, date of birth, gender, and relationship.
[Visual: A dependent entry form appears, displaying required fields for first name, last name, social security number, date of birth, gender, and relationship.]

What information do I need to include for my employees?

It is important that the date of birth and social security number (SSN) is accurate for each of your employees. We use these to match the employee to your coverage. If the information isn’t correct, the employee won’t be able to shop for health coverage until the discrepancy is resolved.

When uploading an employee roster, mandatory fields for employees are: Relationship, last name, first name, email, Social Security number (SSN), date of birth (DOB), gender, date of hire, and Is business owner?

Mandatory fields for dependents are: Relationship, last name, first name, SSN, DOB, and gender.

However, you do need to include the address when adding employees manually.

How can I determine which providers or facilities are included in a plan offered through the Health Connector?

Use the Provider Search Tool to find out which providers, such as doctors and facilities, are in the network of different plans offered through the Health Connector. With this tool, you can search for providers by name, location, specialty, health plan, and more. 

It’s also a good practice to check in with any doctors or other providers you see to double-check their status with the insurance company you are looking into.

What are the Employer Choice Benefit Model Options?

When you shop for a health plan, you’ll have three options for your group’s benefit package structure.

(1) One Single Plan: The employer can offer 1 sole health plan. All employees will enroll in that same plan.
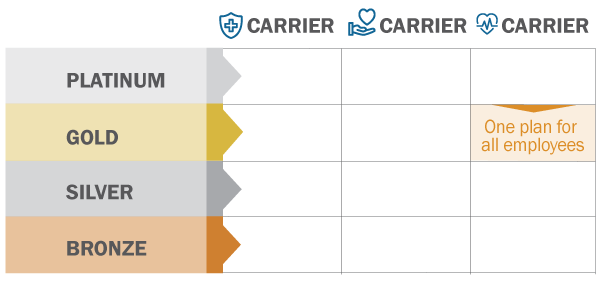
Insurance plan comparison chart with four tiers.

(2) One Level: The employer will select either a Gold or Silver metal level. The employer will then select a specific reference plan within the metal level. Employees can choose a plan within the selected metal level from any of the available carriers.
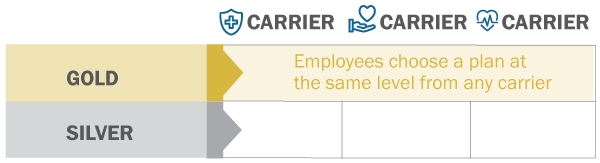
Gold and silver plan options for employees.

(3) One Carrier: The employer will choose an insurance company (carrier). The employer will then select a specific reference plan from the available plans offered by the insurance carrier. Employees can choose any plan at the Platinum, Gold, or Silver level from the selected insurance carrier.
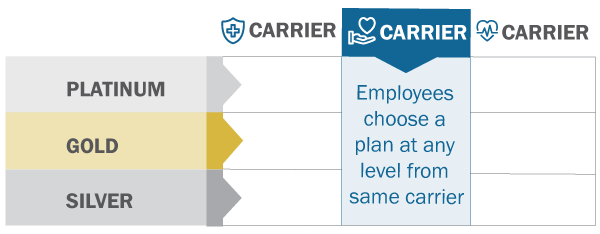
Health plan options chart for employee choice.

How do employer/employee contributions work with One Level/One Carrier Plans:

The employer is agreeing to contribute a specific amount towards the selected reference plan, so their contribution will remain consistent regardless of the plan the employee selects.

If an employee selects a plan less expensive than the employer’s reference plan, the employee’s share of the cost will be lower. If an employee selects a plan more expensive than the employer’s reference plan, the employee will cover the difference.

Hypothetical Example

  • The employer selects a One Carrier/One Level benefit model and will contribute 50% towards employees’ premiums. Employee #1 would like to enroll in coverage.
  • If Employee #1 enrolls in the employer’s selected reference plan:
    • Total premium: $600
      • Employer pays: $300
      • Employee pays: $300 ↔
  • If Employee #1 enrolls in a plan less expensive than the employer’s selected reference plan:
    • Total premium: $400
      • Employer pays: $300
      • Employee pays: $100 ↓
  • If Employee #1 enrolls in a plan more expensive than the employer’s selected reference plan:
    • Total premium: $800
      • Employer pays: $300
      • Employee pays: $500 ↑

How are premium rates calculated for health plans?

For One Single Plan: Premiums will be calculated and displayed in composite bill format for four tiers, including (1) employee-only, (2) employee plus spouse, (3) employee plus dependent(s), and (4) family.  The driver of these composite rates are the dates of birth and expected enroll/waive of each employee.

Final premium rates will be the composite premium.  Premium rates are dependent on the average ages of all who enrolled in each of the tier types at the close of open enrollment, and all employees in each tier will pay the same rate.

For One Level and One Carrier Plans:  Premiums will be calculated and displayed in list billing format. This means that every enrollee will be rated individually based on their dates of birth and the dates of birth of their dependents. 

What do I do when I have a renewal?

Option 1: Keep your current plan

If you want to stay in your current health plan for another year, simply log into your new account and pay the new premium amount in your employer account.  By doing so, your coverage will be automatically renewed. 

Option 2: Change your plan

You can shop from plans offered by other insurers on our new platform. Our system makes it easy to compare your options and enroll in a new plan. The deadline to change plans for next year is before your annual renewal date.

View coverage deadlines now.

When you renew, please update any information about your company or your employees. You can make these updates in your online account.

An invoice will be available for your renewal at the start of the month before you renew. This bill will need to be paid by 23rd. Making an online payment is the easiest and fastest way to pay. However, you can also call us to make a payment over the phone. To make a payment by phone, call us at 1-888-813-9220.

If you change plans, or add or drop employees or dependents, you will see a correction on your invoice the following month after you renew.

If you currently have an automatic payment set up from your bank, you may need to adjust the amount owed to reflect the renewal amount.

If I change my plan offerings, do my employees need to enroll or waive coverage?

Is there a required participation percentage that my group needs to meet?

Yes, just like a new group, renewing groups must meet 75% participation for coverage to go into effect.  This means that employees should enroll in or waive coverage.

How do I view my group’s invoice?

Step 1: Log in to your account.

Step 2: Click on Billing.
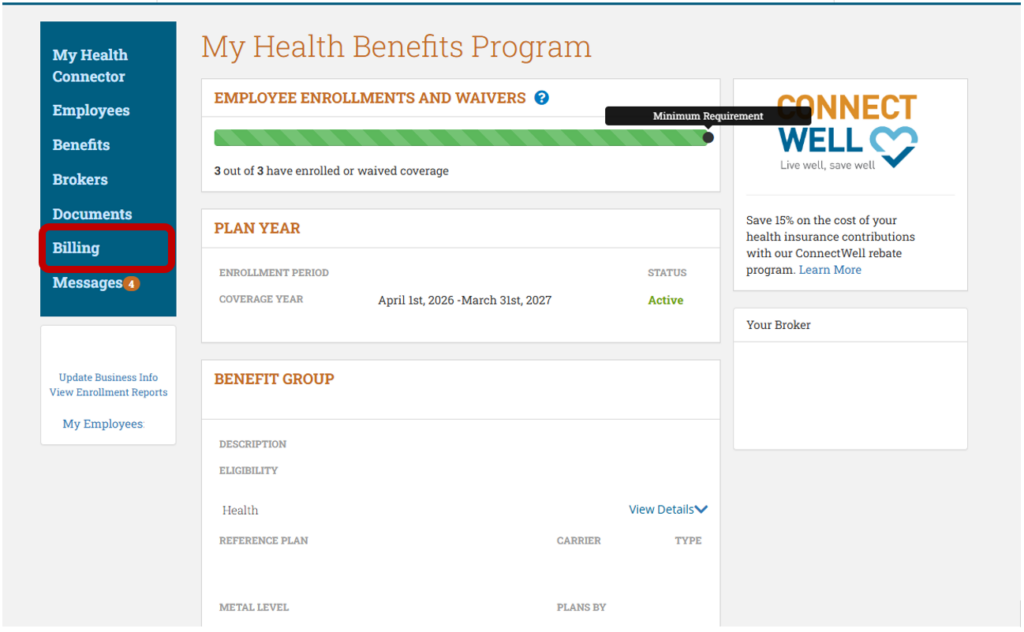
Screenshot of a webpage titled 'My Health Benefits Program' with a sidebar menu on the left, highlighting the 'Billing' section. The main content displays enrollment status, plan year details, and benefit group information.

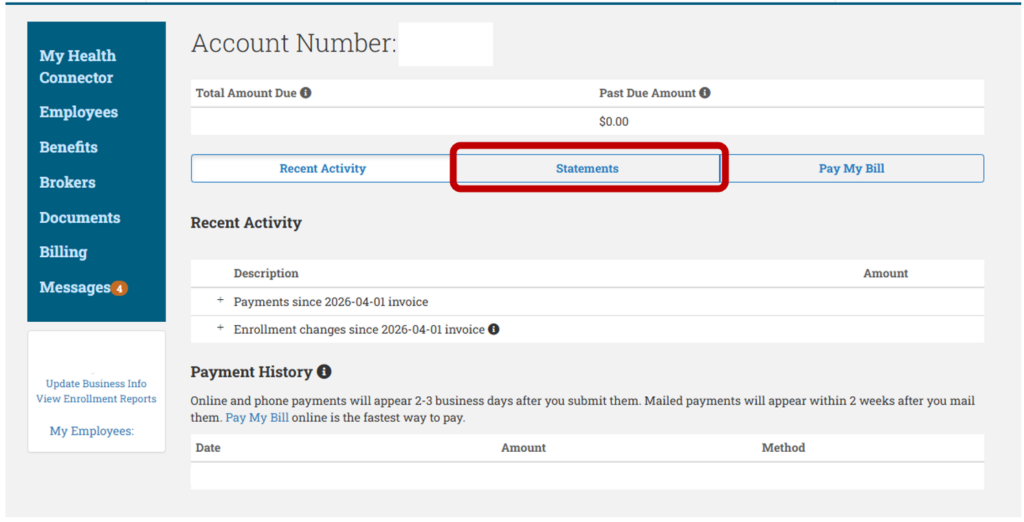
Step 3: Click Statements.

A screenshot of an account summary page for 'My Health Connector.' The page shows  options for 'Recent Activity,' 'Statements,' and 'Pay My Bill.' The 'Statements' tab is highlighted.

Step 4: Click the plus sign (+) next to the year you are looking for to see a drop-down of statements for each month of the year.
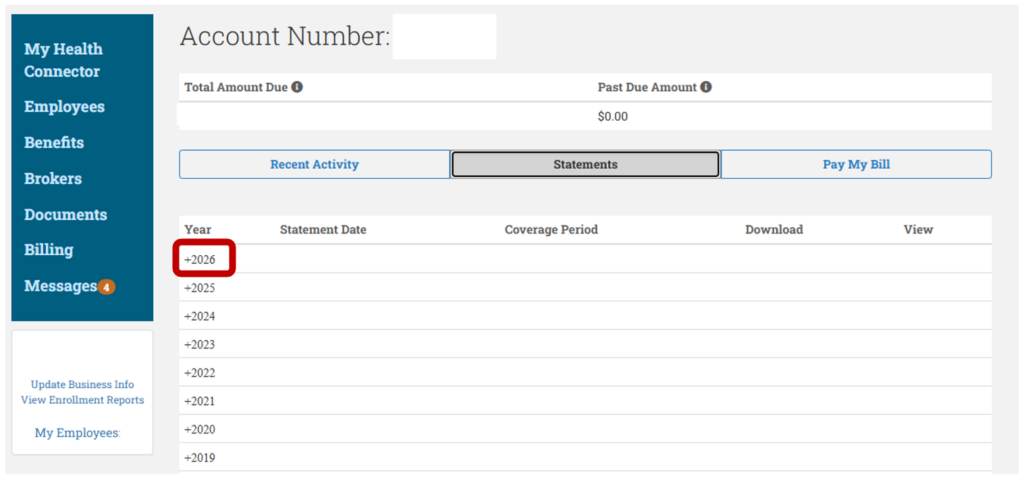
Screenshot of the account management interface from an online portal. The image shows 'Statements' is selected. A highlighted year, 2026,  with a plus sign is listed under statements, followed by past years back to 2019.

Step 5: Click View or Download to review the invoice.
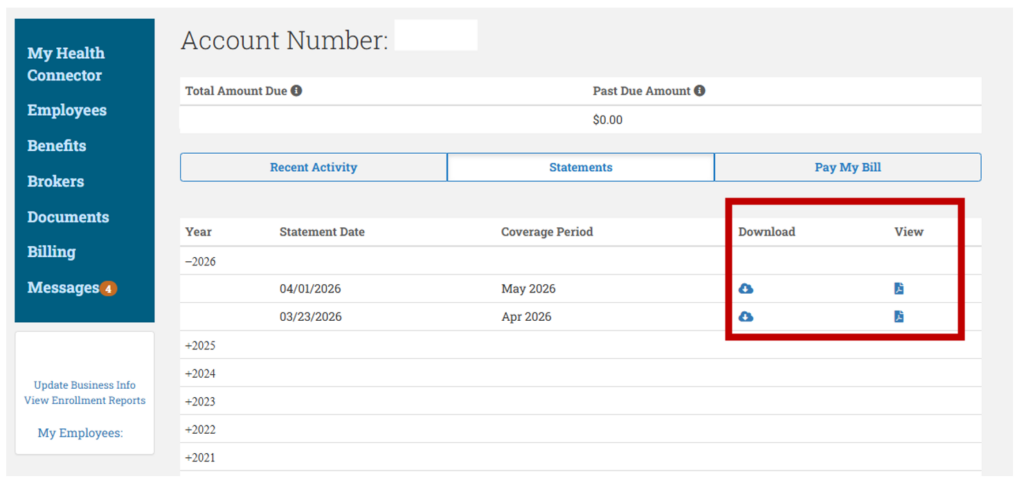
This image shows a webpage for an account overview. Statements is selected as is the year 2026. A table lists statements for years 2026, with statement dates and coverage periods in April and May. Icons for downloading and viewing documents are on the right.

What is a binder payment?

Your first insurance payment is known as a binder payment. 

When do I make my group’s first binder payment?

Your first payment is typically due on the 23rd of the month.  Please log in to your account on the 21st of the month to view your invoice and make a payment.

How do I make my group’s first binder payment?

First payments can be made online or over the phone. NOTE: First binder payments cannot be paid using autopay.

  • Phone: Call 1-888-813-9220 and ask to make your group’s binder payment.
  • Online: Follow the instructions here

Account Management

What qualifies employees to make mid-year changes to their coverage?

The Health Connector for Business will allow eligible employee(s) and eligible dependent(s) to enroll in coverage, make changes to their enrollment, or terminate their enrollment during a plan year because of a mid-year qualifying event.

Examples of qualifying life events include:

  • Getting married or entering a legal domestic partnership
  • Having a baby or adopting a child
  • Getting divorced
  • Death of a family member
  • Moving out of the health plan’s service area
  • Child losing coverage due to age
  • Employment changes (starting or losing a job, or changing work hours)

For more qualifying life events, see the Health Connector for Business Policy: Mid-Year Life Events.

When will an enrollment change for a QLE take effect?

The enrollment change for a QLE will take place the first of the month following or coinciding with the QLE date, except for the birth of child, which takes place on the child’s birth date.

 How can an employee submit a qualifying life event (QLE)?

They should report it at the time it happens; it cannot be reported as a future event. Employees need to log in to their online accounts to report it.

View the video for the steps an employee should take to submit a QLE.

Video: Adding a Qualifying Life Event (QLE)

Find out how an employee signs in and submits a qualifying life event to update their coverage. This video shows how to add household members, choose who needs coverage, and confirm a plan selection.

Video Title: HCB Employers: Adding a Qualifying Life Event
Publisher: Health Connector
Video Duration: 00:54

Transcript

[0:00]
Narrator: Here is how an employee submits a qualifying life event.
[Visual: The screen displays the Health Connector employee account dashboard.]

[0:04]
Narrator: First, the employee must sign into their account.
[Visual: The employee sign-in page appears. The cursor enters login credentials and signs in.]

[0:08]
Narrator: First, choose the qualifying life event.
[Visual: The cursor selects the qualifying life event from a list of options on screen.]

[0:12]
Narrator: Next, add the actual date of the event. Click Continue to proceed.
[Visual: The cursor enters the event date in the date field, then clicks the “Continue” button.]

[0:18]
Narrator: To add a member to the household, click Add Member and enter the information.
[Visual: The cursor clicks the “Add Member” button and begins entering member details.]

[0:24]
Narrator: Enter the date of birth, gender, and relationship to primary. Then click Continue.
[Visual: A member entry form appears. The cursor fills in date of birth, gender, and relationship to primary, then clicks “Continue.”]

[0:31]
Narrator: Select the boxes next to the names to select the members in the household that need coverage.
[Visual: The screen lists household members with checkboxes. The cursor selects the boxes next to the names that need coverage.]

[0:38]
Narrator: Select Shop for New Plan or Keep Existing Plan.
[Visual: The cursor points to two options—”Shop for New Plan” and “Keep Existing Plan”—and makes a selection.]

[0:43]
Narrator: Review the plan selection, effective date, and household members covered before finalizing the health plan. Click Confirm to submit the plan selection.
[Visual: A summary page displays the plan selection, effective date, and covered household members. The cursor clicks the “Confirm” button.]

[0:51]
Narrator: You can print this page for your records.
[Visual: The confirmation page appears with a print option. The cursor selects the print button.]

 How can an employee submit a qualifying life event (QLE) to terminate their coverage?

View the video for the steps an employee should take to submit a QLE to terminate coverage. Employers cannot do that on their behalf.

Video: Terminating Coverage Due to a Qualifying Life Event

Understand how an employee can waive coverage after a qualifying life event. You’ll see how to confirm the household, select the plan to terminate, and choose the reason for waiving coverage.

Video Title: HCB Employers: Terminating Coverage Due to a Qualifying Life Event
Publisher: Health Connector
Video Duration: 00:42

Transcript

[0:00]
Narrator: Here is how an employee with a qualifying life event can terminate coverage.
[Visual: The screen displays the Health Connector employee account dashboard.]

[0:04]
Narrator: Have the employee sign into their account.
[Visual: The employee sign-in page appears. The cursor enters login credentials and signs in.]

[0:08]
Narrator: Begin by choosing the qualifying life event at the bottom right of the screen.
[Visual: The cursor moves to the bottom right of the screen and selects the qualifying life event option.]

[0:14]
Narrator: Next, add the actual date of the event, then click the Continue button.
[Visual: The cursor enters the event date in the date field, then clicks the “Continue” button.]

[0:20]
Narrator: Click Continue to proceed.
[Visual: The cursor clicks the “Continue” button to advance to the next step.]

[0:23]
Narrator: Confirm your household, then click the Continue button.
[Visual: The screen displays the household members. The cursor confirms the household and clicks the “Continue” button.]

[0:28]
Narrator: Click Waive Coverage for the plan that you wish to terminate.
[Visual: The cursor clicks the “Waive Coverage” option next to the plan selected for termination.]

[0:32]
Narrator: Select the reason the employee is waiving coverage. You’ll see a green “Waive Coverage Successful” banner.
[Visual: The cursor selects a reason from the drop-down menu. A green “Waive Coverage Successful” banner appears on screen.]

[0:39]
Narrator: Click Print to print this page, then click Continue to return to the account home page.
[Visual: The cursor clicks the “Print” button, then clicks “Continue” to return to the account home page.]

 How do I terminate an employee?

View the video to see how to terminate an employee in the employer portal, and add them into COBRA.

Video: Terminating an Employee

Learn how to remove an employee from your roster by entering their termination date. This video also shows how to initiate COBRA so a former employee can continue their coverage.

Video Title: HCB Employers: Terminating an Employee
Publisher: Health Connector
Video Duration: 00:35

Transcript

[0:00]
Narrator: To terminate an employee from your employee roster, sign in to your employer account.
[Visual: The Health Connector employer sign-in page appears. The cursor enters login credentials and signs in.]

[0:06]
Narrator: Select the Employees tab and choose the correct employee.
[Visual: The cursor clicks the “Employees” tab, then selects the correct employee from the roster list.]

[0:12]
Narrator: Select the Actions button, then choose Terminate from the menu options.
[Visual: The cursor clicks the “Actions” button and selects “Terminate” from the drop-down menu.]

[0:18]
Narrator: The last date of employment should be the termination date. Enter the termination date and click Terminate Employee.
[Visual: A termination form appears. The cursor enters the termination date, then clicks the “Terminate Employee” button.]

[0:26]
Narrator: If you want to enroll them in COBRA, choose Initiate COBRA from the Actions options.
[Visual: The cursor clicks the “Actions” button and selects “Initiate COBRA” from the menu.]

[0:31]
Narrator: You will see this notice. Click on Initiate COBRA to enroll the former employee.
[Visual: A confirmation notice appears on screen. The cursor clicks “Initiate COBRA” to enroll the former employee.]

 How do I initiate an employee into COBRA?

Once you have terminated the employee in the Employer Portal, choose “Initiate COBRA” from the Actions menu for that employee.  Before doing so, please first confirm that your former employee wants to enroll in COBRA.
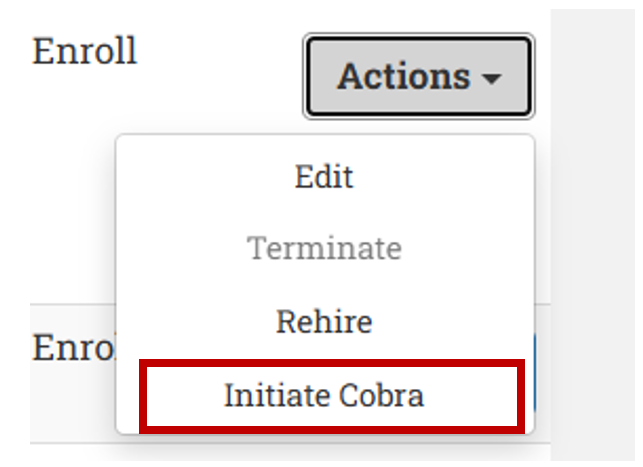
A screenshot of a dropdown menu labeled

Review the notice and then click “Initiate COBRA.”
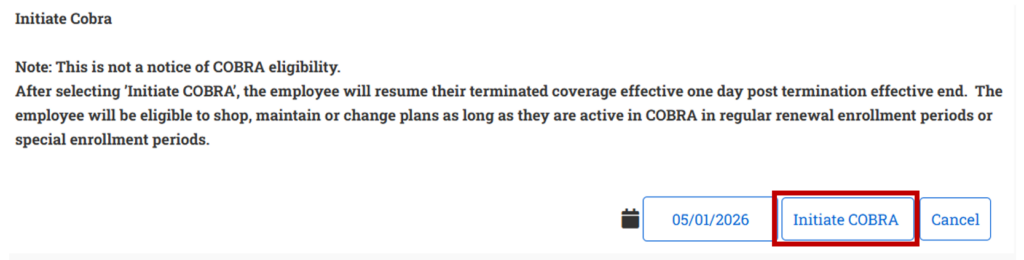
A screenshot showing a section titled

 Does Health Connector for Business administer COBRA for employers?

The Health Connector for Business and our carriers do not administer COBRA on behalf of employers or brokers, but we are able to offer the following guidance:

The Massachusetts small group continuation of coverage law (Mini-COBRA) requires small group carriers to provide for the continuation of health benefits to employees of small businesses with 2-19 employees.

Federal COBRA law governs employers with 20 or more employees.

You can learn more about Massachusetts’ mini-COBRA and federal COBRA at these two links:

 What are employer’s responsibilities for COBRA?

Employers must offer COBRA coverage to qualified beneficiaries who were enrolled in health insurance. The qualified beneficiaries must determine if they want coverage. Each qualified beneficiary has individual COBRA rights, which means that any single individual can elect COBRA.  The former employee does not need to elect for the dependents to obtain COBRA.

Qualified beneficiaries covered through COBRA must remain on the plan that was in effect on the date that they became eligible for COBRA; in other words, they cannot change plans mid-year.

Employers are responsible for collecting premiums and making payments directly to the Health Connector.

For COBRA to continue, a company must have at least one active employee enrolled in health insurance coverage.

 What steps do businesses and employees need to take to enroll in COBRA?

There are several steps that businesses and their former employees must take to enroll in COBRA. 

  1. Businesses are required to provide notice to their former employees about how to enroll in COBRA. While the Health Connector for Business is not an administrator, we created a sample notice that can be downloaded here.
  2. An employer or broker must terminate the employee in the Health Connector system and then click the button that initiates COBRA if the employee confirmed that they want COBRA. They have 60 days to do this, and coverage will go back to the date coverage was terminated.
    • View the video to see how to terminate an employee in the employer portal, and how to add them into COBRA. Please confirm with your former employees that they want to be enrolled in COBRA before doing so.
  1. The employer will be billed for COBRA coverage along with any other employees. The employer is still responsible for collecting the premium due from the former employee. 

 Insurance Carriers

 When will my employees receive insurance ID cards?

Carriers typically mail ID cards in 10-12 business days after the effective date. Some carriers also provide digital cards via their member portals. 

 What should I do if my employees don’t receive insurance ID cards?

The employee should first contact the carrier for assistance before contacting the Health Connector.   The carrier may be able to provide the member ID over the phone.  If it’s been more than 10 business days, please reach out to the Health Connector. Here is where you can find contact information for the carriers.

 Who should my employees contact if they have questions about claims?

Carriers manage claims and approve or deny services.

 How can employees get tax forms?

Carriers issue 1095-B forms to Health Connector for Business members for federal tax reporting. Carriers issue 1099-HC forms for Massachusetts state tax reporting. The Health Connector does not issue any tax forms for small group enrollees.